Special reminder:
Activation steps:
1、After double-clicking to install Paragon NTFS,Open the Activation Tool and click Step 1。
2、Return to the ParagonNTFS software interface and click Trial。
3、Return to the Activation Tool and click Step 2。
Please follow the steps,there will be no problem,Can be used normally。
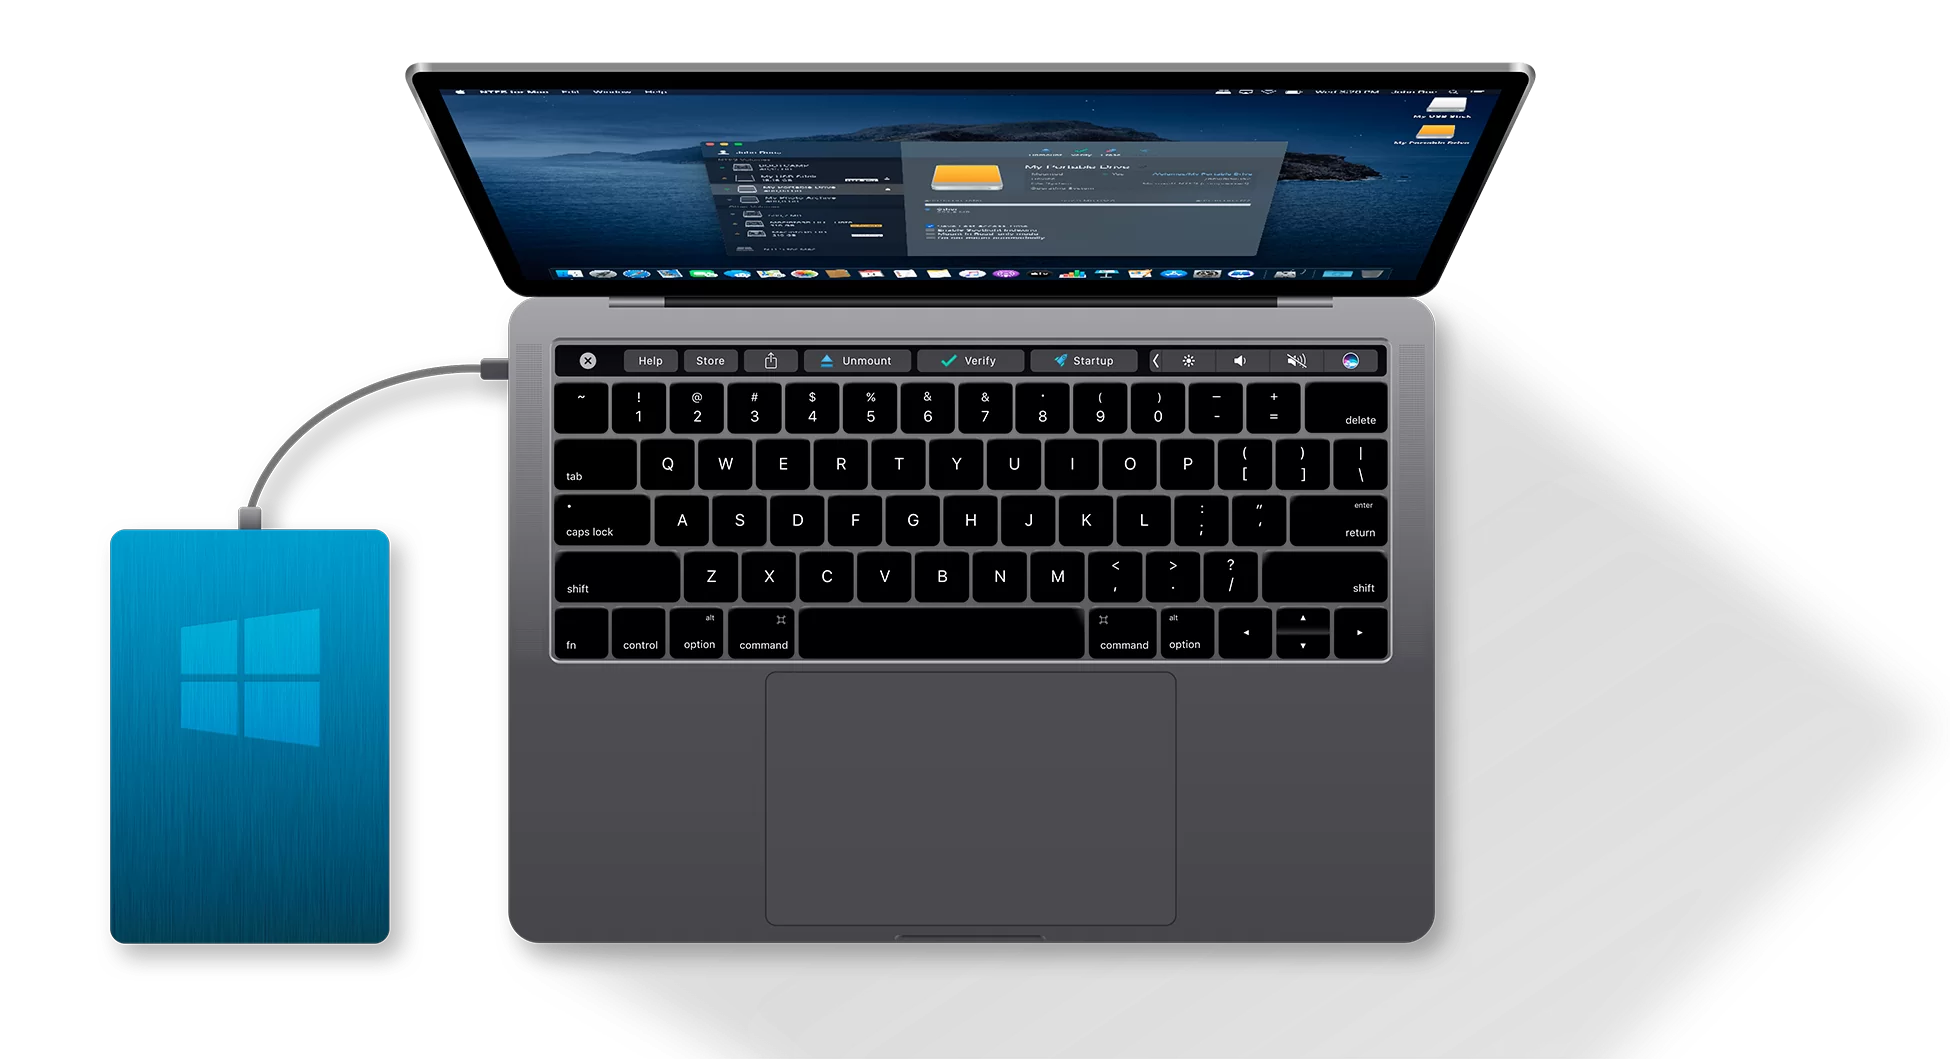
Paragon NTFS for Mac cracked version is a powerful ntfs disk reading and writing tool。By default, NTFS partitioned disks cannot be created in macOS.、Delete or modify files,can only read。Paragon NTFS is used to solve the problem of Mac not recognizing Windows NTFS hard drive.。By Paragon NTFS,You can have full read/write access to any partition of NTFS under mac。
statement:All articles on this site,If there is no special instructions or markings,All are originally published by this site。any person or organization,Without the consent of this website,Reproduction prohibited、Misappropriate、collection、Publish content from this site to any website、Books and other media platforms。If the content on this site infringes upon the legitimate rights and interests of the original author,You can contact us for processing。
Can free downloads or VIP membership resources be used directly for commercial use?
The copyright of all resources on this site belongs to the original author,The resources provided here are for reference and study purposes only.,Please do not use it directly for commercial use。If copyright disputes arise due to commercial use,All responsibility lies with the user。For more instructions, please refer to VIP introduction。
It prompts that the download is complete but cannot be decompressed or opened?
The most common situation is an incomplete download: You can compare the capacity of the downloaded compressed package with the capacity on the network disk,If it is less than the capacity prompted by the network disk, this is the reason。This is a browser download bug,It is recommended to download using Baidu Netdisk software or Thunder。 If this situation is excluded,You can leave a message at the bottom of the corresponding resource,or contact us。
Can't find the sample image in the material resource introduction article?
For members only、Whole site source code、Program plug-in、website template、Web page templates and other types of materials,The pictures used for introduction in the article are usually not included in the corresponding downloadable material package.。These related commercial images need to be purchased separately,And this site is not responsible for(There is no way)find source。 The same is true for some font files,However, some materials will have a list of font download links in the material package.。
The download address cannot be displayed or the content cannot be viewed after payment?
If you have successfully paid but the website does not pop up a success prompt,Please contact the webmaster to provide payment information for you to process
After purchasing this resource,Can I get a refund?
Source code materials are virtual goods,replicable,Transmissibility,once granted,No refunds of any kind will be accepted、Exchange request。Please confirm before purchasing to obtain the resources you need.
Comments (1)
Note: Please be respectful and civil in your comments Cancel reply
Micro Snitch is a launchBar manufacturer that can monitor whether the computer is controlled by others using the camera or recording.。 Know when someone is spying on you! Ever wondered if an app was recording audio through your Mac's built-in microphone without your permission? Or are there cameras taking video for no legitimate reason? With Micro Snitch,These doubts will disappear naturally。This super-tiny menu bar app runs silently in the background,Monitor and report any microphone and camera activity,Tell you if someone is spying on you。 That's right,You can also observe the camera’s indicator light,But what if you're not at your computer? for microphone,No indication of activity at all,So even if you're sitting in front of your Mac,If the microphone is turned on,You won't find out either。 by Micro Snitch,You can tell if an app is using your microphone,Its logging feature allows you to spot any suspicious activity。 Menu Bar Icon Any current microphone or camera activity will be displayed in the menu bar。The menu also displays a list of connected audio/video devices。 Overlay A screen overlay is displayed when the microphone or camera is turned on,Make sure you don't miss it,Even when the menu bar is not currently visible。 Logging Never miss any microphone or camera activity,Even when you're not at your computer。Each status change will be recorded in a file,so you can view it later,Find suspicious activity。 Notifications when a device becomes active or inactive,Micro Snitch displays a notification。You can also enable notifications when you connect or disconnect from your device。 Accessibility Micro Snitch supports accessibility features built into OS X,For example VoiceOver。By pressing a configurable shortcut key,Micro Snitch displays current microphone or camera activity as text,VoiceOver can read automatically。
PDF Reader Pro 4.7 for Mac is a PDF editing and reading software specially designed for Mac users,it brings together reading、edit、Comment、Conversion and other functions in one,Provides users with a comprehensive PDF management experience。The following is a detailed introduction to the software: one、Software features Powerful reading function Supports multiple reading modes and view selections,Such as single page、scroll、double page、full screen、Preview etc.,Users can adjust the page layout according to their personal preferences、Font size and color etc.,for the best reading experience。 Provide bookmarks、Table of contents and full-text search capabilities,Help users quickly locate and understand document content,Improve work efficiency。 Support night mode,Protect user’s eyesight。 Comprehensive editing functions provide rich text editing tools,Users can easily modify the text content in PDF documents,Adjust font style and size。 Support inserting pictures、Link,and adjust page order、Operations such as deleting or adding pages,Meet users’ personalized needs for PDF documents。 Equipped with a variety of annotation tools,such as highlighting、Underline、text box etc.,Facilitate users to mark key points during reading、record ideas。 Efficient conversion function supports converting PDF files to Word、Excel、PPT and other formats,Achieve seamless switching of document formats。 Provide batch conversion function,Further improve work efficiency。 Security protection function supports encryption and decryption of PDF files,Secure files from unauthorized access and modification。 Provide signature PDF function,The user can use the cursor mouse、trackpad、Create signature from keyboard or image,Enhance document security。 two、Software advantages: Simple and intuitive interface PDF Reader Pro 4.7 The interface design for Mac is simple and clear,Function icons are clear,easy to understand,Easy to operate。 Stable and reliable performance The software performs well when processing large PDF documents,Ability to quickly load and render document content,Provide a smooth reading and editing experience。 Strong compatibility supports multiple document formats (such as PDF、EPUB、TXT、PNG、JPEG, etc.) opening、Edit and save,Meet user needs in different scenarios。 Rich customization options: users can adjust software settings according to their own needs,Achieve personalized user experience。 three、Application Scenario Daily Work Suitable for processing PDF files in daily work,such as contract、Report、Resume, etc.。 Academic Research Support for academic papers、Read research reports and other PDF documents、Annotation and editing。...
HEIC (High Efficiency Image File Format) dynamic wallpaper allows you to set a desktop background that changes over time on your Mac。Here are two ways to set HEIC dynamic desktop wallpaper: Method one:Use system preferences 1. Download HEIC Live Wallpaper •First,Make sure you have downloaded the HEIC format live wallpaper file you want to use,For example "Japanese_street.heic"。 2. Install HEIC live wallpaper •Drag and drop the downloaded HEIC live wallpaper file into the desktop background folder:/Library/Desktop Pictures。 •Can be opened via Finder,Press Shift+Command+G,Enter the path /Library/Desktop Pictures,Then drag the HEIC file into that folder。 3. Set a live wallpaper • Click the Apple icon in the upper left corner of the screen,Select "System Preferences"。 •Click on the “Desktop & Screen Saver” option。 •Select the desktop you want to set as live wallpaper on the left。 •Select the HEIC live wallpaper you just installed on the right,It should appear in the Dynamics tab。 •After confirming your selection,The desktop will display the dynamic wallpaper you set。 Method two:Use right-click menu settings 1. Download and install HEIC Live Wallpaper • Same,Drag and drop the downloaded HEIC live wallpaper file into the desktop background folder:/Library/Desktop Pictures。 2. Setting via right-click menu • Open Finder,Go to the /Library/Desktop Pictures folder。 • Find and right-click the HEIC live wallpaper file you want to set (eg "Japanese_street.heic")。 •Select "Service" in the pop-up menu > "Set desktop picture"。 3.Confirm settings •The desktop will apply the HEIC live wallpaper you selected。
FastScripts is a script calling tool on the Mac OS platform,Let users quickly execute AppleScript or shell scripts through menus in any application,Users can customize shortcut keys for any script in the menu and edit scripts through convenient shortcut keys.。 FastScripts is a quick script calling tool,Placed on Menubar,The submenu contains various types of scripts,FastScripts loads all Scripts in the Library/Scripts directory by default,Select “Create xxx Scripts Folder” to create a script folder named after the current program.,You can put the script in it and call it at any time,also,FastScripts can also set shortcut keys for each script。
Many Mac users may not know,Mac computers have a hidden screen-rotating feature。by rotating the screen 90 degree,You can read e-books or movies while lying down。So,How to rotate the screen on a Mac computer? Let me share with you the specific method below,Let’s take a look together。 1. Open System Preferences •Click on the Apple icon in the upper left corner,Choose to enter System Preferences。 2. Go to monitor settings •In System Preferences,Click on the "Display" option。 3. Select the rotation angle •In the monitor settings interface,Find the "Rotate" option。There are three rotation angles to choose from in the drop-down menu:90 degree、180 degree and 270 degree。After selecting the desired rotation angle,Exit settings to complete。 Notes •If you don’t see the “Rotate” option in your monitor settings,It may be that your computer does not support the screen rotation function。 Go through the above steps,You can easily rotate your Mac screen,Bring more convenience to your use。
iShot Pro is an excellent Mac、Fully functional area screenshots、Window screenshot、Multi-window screenshot、long screenshot、Screenshot with shell、Time-lapse screenshot、Quick annotation、stickers、Toriiro、screen recording、recording、OCR、Screenshot translation tool。 Function 1、Screenshot area screenshot、Window screenshots support frame selection screenshots、Smart recognition window screenshot,Customize screenshot shortcut keys。 Multi-window screenshot Press the screenshot shortcut key,Add Shift,Click multiple windows,Take multi-window screenshots。 Time-lapse full-screen screenshot Time-lapse full-screen screenshot,Support countdown sound playback,Used to capture windows that are difficult to select。 Take a screenshot of the last screenshot area using shortcut keys,Quickly take a screenshot of the last selected screenshot area。 Take a screenshot of the window under the cursor using shortcut keys,Directly screenshot the window under the current mouse,No need to activate this window。 Screenshot guide rounded corners、Shadow effect supports automatic rounding of corners in screenshots、Screenshot shadow can be colored、Size adjustment,Make your screenshots more elegant。 Quickly open the screenshot. After completing the screenshot, you can double-click Option.,Open pictures using a custom app,make your screenshot、Edit seamlessly。 The default is to use "Preview" to open the image,You can also set it to open using other apps;in addition,When selecting Finder,Is to open the Finder location where the screenshot was saved。 Save/Storage Supports saving to clipboard、Save to local. Supports saving to clipboard and local at the same time. Supports single save as.,Custom storage name and format supports HD、Two image qualities, standard definition and jpg supported、png、tiff screenshot saving format supports outputting color standard pictures 2、Long screenshot scrolling、Screenshot Select the scrolling screenshot area,Then press the "S" shortcut key,Slide up the screenshot area,Start taking long screenshots,There is no limit to the length of long screenshots。 Support automatic scrolling of long screenshots。 three、Screenshot with shell After screenshot of full screen,Match your pictures with beautiful Mac case mockups,High-end elegance。 Four、After the map supports frame selection area,Click the sticker button to sticker; The texture library will store the texture records,Supports using the shortcut key "option+s" to open the texture library,Select pictures from the sticker library for stickers; Supports right-clicking after mapping,mark、Modify sticker image。 Supports texture adjustment for transparency,Rounded corners. Supports hiding/displaying all texture windows by pressing shortcut keys. Supports fixing textures/following desktop settings. Five、Quick annotation annotation function:...
The startup screen may vary depending on your Mac model、Varies depending on factors such as operating system (macOS)。Some screens, such as the ban sign or question mark, mean you need to solve a problem first,Then the Mac can complete booting。For all Mac models,When you see the Finder menu bar、Desktop and Dock,This means that the startup is complete。today,The editor of MacW will take you to understand what the various interfaces displayed when Mac starts up represent.。 1. Forbidden symbol A circle crossed by a line or slash means that the selected startup disk contains a Mac operating system,But it's not macOS for your Mac。You should reinstall macOS on this disk。 2. Question mark A folder with a question mark means that the selected startup disk is not available,or does not include Mac OS。Learn how to fix problems with flashing question marks。 3. Blank Screen It is normal to have one or more blank screens during startup.。it may be black、grey、blue,It could also be a desktop picture。If no image appears on the screen after a while,Make sure your display is on、Connected and brightness turned up。 4. Apple Logo Your Mac displays the Apple logo after finding the local startup disk,This disk is the Mac's built-in startup disk or is directly connected to the Mac's startup disk。If your Mac cannot find your local startup disk,then it will try to use a network boot disk if one is available。As the boot process continues,You should see a progress bar or indicator showing the circle (which may or may not contain the Apple logo)。This screen may alternate with a blank screen multiple times。 If you're updating or reinstalling macOS,then this stage may take longer to complete。As the installation continues,The progress bar may move slowly and pause for a long time。Find out if your Mac seems to be stuck on this screen during the installation process or just after the installation is complete,what to do。 5. Rotating Earth When using a network boot disk,Your Mac displays a spinning globe instead of the Apple logo。When launching from macOS recovery function over the Internet,There will also be a rotating earth。As the boot process continues,You should see a progress bar,It may alternate with a blank screen multiple times。 6. Earth with warning symbol when your Mac tries to boot from macOS Recovery over the Internet and fails,You may see a globe with an exclamation mark。Your Mac may not be able to connect to the internet,Or it might be using a network configuration that's incompatible with macOS recovery features。Please try the following solutions: – Use Command-R on startup to try to use the built-in macOS recovery system,Rather than booting from macOS recovery over the Internet。 – Connect to the Internet using Ethernet instead of Wi-Fi,vice versa。 – Connect to the Internet from another network。 – Please try again later,Because the problem may be temporary。 7. Lock icon If your Mac uses a firmware password,then when you try to download a file from another disk or volume such as,external drive or macOS recovery) a lock icon appears when starting。Please enter your firmware password to continue。 8. PIN code to lock your system if your Mac is locked remotely via the Find My feature,then your Mac will ask for a PIN。Please enter a four-digit or six-digit password to continue。 9. Login window In the login window,Enter your user account password,to log into your Mac。If FileVault is open,then this action will also unlock your disk。You may see the default desktop picture in the background,After you select your account,This image may be changed to a desktop image of your choice。 By understanding these launch screens,You can better solve problems you encounter when your Mac starts up,Make sure your Mac starts up smoothly and works normally。
Beyond Compare is an old comparison tool,Provides rich comparison functions。It can be used to compare various types of files and folders,Include plain text files、Rich text document、compressed file、FTP sites and more。It helps users compare file differences、Keep folders in sync、File merge、Analyze differences in multimedia files,Even visually compare registry files。The main goal of Beyond Compare is to help users analyze differences in detail,and conduct detailed processing。The software already contains many default preset templates,User-friendly。Save on rewrite costs with Beyond Compare,Improve work efficiency,and reduce the likelihood of errors occurring。
Little Snitch is an old and excellent application firewall software on the Mac platform.,Little Snitch cracked version can control network connection access permissions of all applications/single applications on macOS,Alert you in real time about outbound network connections。 App Introduction Little Snitch allows you to intercept these unwanted connection attempts,and let you decide how to proceed。it can notify you,When a program attempts to establish an outgoing Internet connection。Then,You can choose to allow or deny this,Or define a rule how to handle something like,Future connection attempts。This reliably prevents private data from being sent to you without your knowledge。The inconspicuous Little Snitch runs in the background,It can also detect network viruses,Trojan and other malware-related activity。 Alert mode whenever an application attempts to connect to a server on the network,Little Snitch will display a connection alert,Allows you to decide whether to allow or deny the connection。 No data is transferred without your consent。 Your decision will be remembered and applied automatically in the future。 Silent Mode If you are new to Little Snitch,You may be inundated with notifications from apps that want to connect to the internet。Brand new silent mode built from the ground up,to make handling them a breeze。It lets you silence all notifications for a certain period of time,and make all decisions conveniently at a later time。
Recently, many friends are installing software on the newly purchased Mac with Touch Bar.,You may encounter situations where the software opens and becomes unresponsive.。This is usually due to the system's enhanced permission management.。If you encounter a pop-up box asking for "Accessibility Access",Here is the solution: Open method: Open system preferences: Click the Apple icon in the upper left corner of the screen,Select "System Preferences"。 Unlock system preferences: In the System Preferences window,Click the lock icon in the lower left corner,and enter your administrator password to unlock。 Add software to accessibility access list: If you have seen the software that needs to be added in the list,Make sure it is checked。 if it does not appear in the list,Click the ➕ button below to add the required software。 Confirm and authorize: After ensuring that the required software has been selected or added,Close system preferences。 Reopen the software: Return to the software you want to open,It should now start normally。 If the software is still unresponsive or does not prompt for accessibility access,It may be because the software version is not compatible with the current system version,Need to download the latest version or wait for updates。These steps can help you solve most cases where the software cannot be opened due to permission issues.。
on Apple computer,You can easily take screenshots with shortcut keys such as Shift+Command+3 or Shift+Command+4,But by default the screenshot will be saved on the desktop。If you wish to save the screenshot to another location,You can follow these steps: Graphical tutorial on setting the screenshot save location and creating a new screenshot folder: Create a new folder within the user's "Pictures" folder,For example, name it "Screenshot"。You can use Finder in "Users" > Create this folder in "Pictures"。 Open terminal: Search for and open the Terminal application in Launchpad。 Enter command: Enter the following command in the terminal,and press Enter to confirm: defaults write com.apple.screencapture location ~/Pictures/Screenshot/ This command tells the system to save the screenshot to the specified folder (here is the "Screenshot" folder you created)。If you wish to save the screenshot to another location,Just change the path to your desired folder path。 Restart system services: Enter the following command to restart system services,Make changes effective: killall SystemUIServer This will reload the user interface service,Make sure the new screenshot save location setting takes effect。 Now,Your Mac will save all screenshots to the folder you specify (e.g. "Users/Pictures/Screenshots")。Doing this will help you keep your desktop tidy,Allows you to manage and find screenshot files more conveniently
SecureFX 9.1.1 for mac is a software that supports SFTP client,it is easy to use,Has an operation interface similar to Windows Explorer。 SecureFX gives you the tools you need to make your file transfer operations and site synchronization more secure and efficient。SecureFX’s user-friendly interface makes it easy to learn,Support for multiple platforms allows you to apply the Secure Shell protocol’s powerful encryption and authentication mechanisms to your data transfers。 SecureFX 8.7.3 supports three file transfer protocols:FTP、SFTP 和 FTP over SSH2。It can provide secure file transfer。No matter which operating system you are connected to the server,It can provide secure transmission services。 The downloaded compressed package contains DMG files suitable for both ARM and INTEL platforms.。Please download and unzip the compressed package and select the corresponding DMG installation according to your Mac system.。
Comments (1)