Micro Snitch is a launchBar manufacturer that can monitor whether the computer is controlled by others using the camera or recording.。
知道何时有人窥视您!
是不是曾经想知道是否某款应用程序未经您的允许通过 Mac 的内置麦克风进行音频录制? 或者是否有摄像头没有正当理由进行视频拍摄?
有了 Micro Snitch,These doubts will disappear naturally。This super-tiny menu bar app runs silently in the background,Monitor and report any microphone and camera activity,Tell you if someone is spying on you。
That's right,You can also observe the camera’s indicator light,But what if you're not at your computer? for microphone,No indication of activity at all,So even if you're sitting in front of your Mac,If the microphone is turned on,You won't find out either。
by Micro Snitch,You can tell if an app is using your microphone,Its logging feature allows you to spot any suspicious activity。
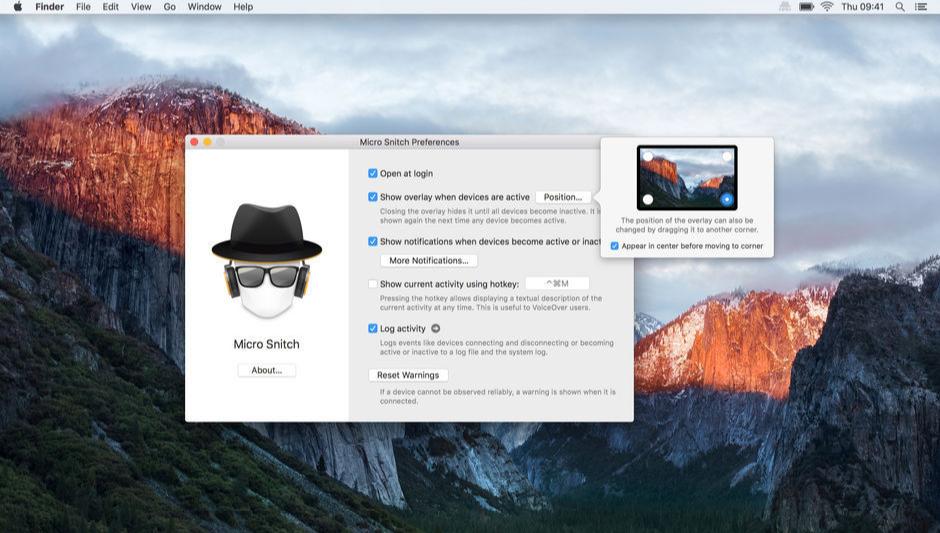
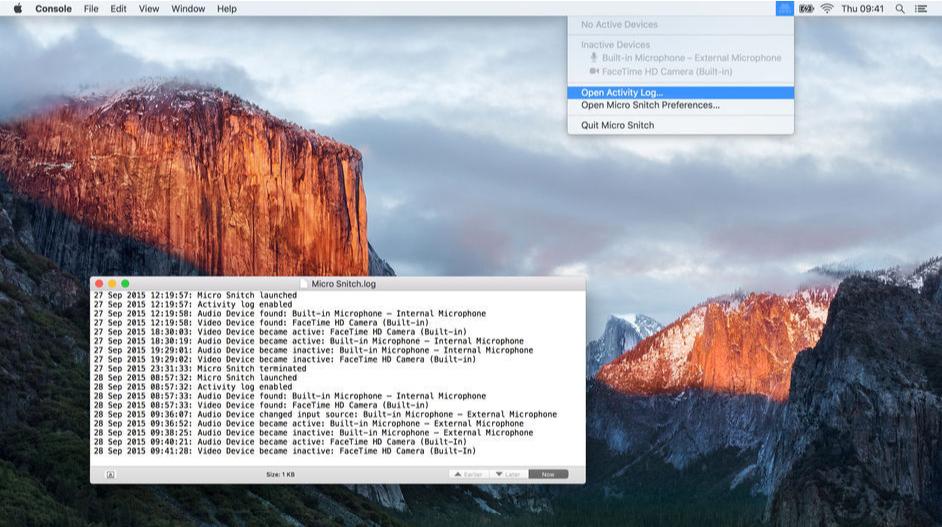
菜单栏图标 当前麦克风或摄像头的任何活动都会显示在菜单栏中。The menu also displays a list of connected audio/video devices。
覆盖 麦克风或摄像头被打开时会显示屏幕覆盖,Make sure you don't miss it,Even when the menu bar is not currently visible。
录入 不会错过麦克风或摄像头的任何活动,Even when you're not at your computer。Each status change will be recorded in a file,so you can view it later,Find suspicious activity。
通知 当设备变为活动状态或非活动状态时,Micro Snitch displays a notification。You can also enable notifications when you connect or disconnect from your device。
辅助功能 Micro Snitch 支持 OS X 内置的辅助功能,For example VoiceOver。By pressing a configurable shortcut key,Micro Snitch displays current microphone or camera activity as text,VoiceOver can read automatically。
statement:All articles on this site,If there is no special instructions or markings,All are originally published by this site。any person or organization,Without the consent of this website,Reproduction prohibited、Misappropriate、collection、Publish content from this site to any website、Books and other media platforms。If the content on this site infringes upon the legitimate rights and interests of the original author,You can contact us for processing。
Can free downloads or VIP membership resources be used directly for commercial use?
The copyright of all resources on this site belongs to the original author,The resources provided here are for reference and study purposes only.,Please do not use it directly for commercial use。If copyright disputes arise due to commercial use,All responsibility lies with the user。For more instructions, please refer to VIP introduction。
It prompts that the download is complete but cannot be decompressed or opened?
The most common situation is an incomplete download: You can compare the capacity of the downloaded compressed package with the capacity on the network disk,If it is less than the capacity prompted by the network disk, this is the reason。This is a browser download bug,It is recommended to download using Baidu Netdisk software or Thunder。 If this situation is excluded,You can leave a message at the bottom of the corresponding resource,or contact us。
Can't find the sample image in the material resource introduction article?
For members only、Whole site source code、Program plug-in、website template、Web page templates and other types of materials,The pictures used for introduction in the article are usually not included in the corresponding downloadable material package.。These related commercial images need to be purchased separately,And this site is not responsible for(There is no way)find source。 The same is true for some font files,However, some materials will have a list of font download links in the material package.。
The download address cannot be displayed or the content cannot be viewed after payment?
If you have successfully paid but the website does not pop up a success prompt,Please contact the webmaster to provide payment information for you to process
After purchasing this resource,Can I get a refund?
Source code materials are virtual goods,replicable,Transmissibility,once granted,No refunds of any kind will be accepted、Exchange request。Please confirm before purchasing to obtain the resources you need.
Comments (0)
Note: Please be respectful and civil in your comments Cancel reply
How to check the password of a connected WiFi on Mac? sometimes,We may need to check the password for the connected WiFi on the Mac,For example, connecting to the same network on a new device。Here's an easy way to check your connected WiFi password on your Mac。 View WiFi passwords using Keychain Access 1. Open the Keychain Access app: •In Finder,Open the Applications folder。 •Go to the "Utilities" folder,Double-click the Keychain Access app。 2. Find a WiFi network: •In the category list on the left side of the Keychain Access window,Select the "System" keychain,Then select the "Password" category。 •Enter the WiFi network name (SSID) for which you want to view the password in the search bar on the right。 3.View password: •Double click on the corresponding WiFi network name,Open properties window。 •In the pop-up window,Check the "Show password" option。 • You will be prompted for your administrator username and password。 •After entering administrator credentials,The WiFi password will appear in the text box next to "Show password"。 Use Terminal to View WiFi Password...
WiFi Explorer Pro is a professional version of WiFi Explorer running on the Mac platform,Can help users monitor and troubleshoot wireless networks,Also has information element decoding、Annotations and custom colors、Spectrum analysis integration、Enhanced filtering and other useful functions。 WiFi Explorer Pro uses the code base of WiFi Explorer,and added a set of features,Making it the right tool for WLAN and IT professionals。You can use WiFi Explorer Pro for a preliminary evaluation,Help design and verify wireless network installation,and identify channel conflicts、overlapping、Poor signal quality and other issues that may affect your home、Connection or performance issues with your office or business wireless network。 Features Passive directional scan mode Spectrum analysis integration Custom filters Support for remote sensors Support for networks with hidden SSID Additional columns with advanced information Additional organization options for scan results Dark vs. light themes
in macOS,By default,You cannot directly view the size of a folder in Finder's list mode.。But you can follow these steps to set it up,Makes it possible to display the size of folders in a list: 1.Open Finder and go to the folder you want to view。 2.Select "Show" in the menu bar > "Show Options" (or just use the shortcut Command+J)。 3.In the pop-up options window,Check "Calculate all sizes"。 4.Close options window。 Now,You can see the actual size of the folder in Finder's list mode.。It should be noted that,This setting is for a single folder,If you want to show size in other folders,Need to repeat the above steps。
SecureFX 9.1.1 for mac is a software that supports SFTP client,it is easy to use,Has an operation interface similar to Windows Explorer。 SecureFX gives you the tools you need to make your file transfer operations and site synchronization more secure and efficient。SecureFX’s user-friendly interface makes it easy to learn,Support for multiple platforms allows you to apply the Secure Shell protocol’s powerful encryption and authentication mechanisms to your data transfers。 SecureFX 8.7.3 supports three file transfer protocols:FTP、SFTP 和 FTP over SSH2。It can provide secure file transfer。No matter which operating system you are connected to the server,It can provide secure transmission services。 The downloaded compressed package contains DMG files suitable for both ARM and INTEL platforms.。Please download and unzip the compressed package and select the corresponding DMG installation according to your Mac system.。
Sometimes your computer runs slow,Lack of storage space may be one of the main reasons。At this time,You may be wondering how much storage space you have left on your Mac。Ideally,There should always be about ten percent of storage space available on your Mac,To ensure that the computer can run smoothly。Here are the effective ways to check storage space and delete apps on Mac。 How to Check Storage on Mac Checking your device’s memory is actually pretty simple,Here are the steps: 1.on the menu bar,Click the Apple logo in the upper left。 2.Select "About This Mac"。 3.Select "Storage"。 This is the easiest way to view storage on your Mac,But you can go further。If you need to take a closer look at your Mac's memory usage,There are several solutions。 In the Storage screen,You can select "Manage",This will take you to a new window。app、document、Photos and other sections can be found on the left side of this window,And a detailed view of these files is shown on the right。 You can also use Finder to check the storage status: 1.Open Finder,Go to the "View" menu item in the menu bar。 2.Select "Show Toolbar"。At the bottom of the Finder window,You will see a new column,Shows the number of the item you selected for this section in the left pane and the total amount of storage available on your Mac。 Disk Utility is another resource。Open Disk Utility,It will show the view of the volume on your Mac,It also shows used space and free space。 How to Manage Storage in macOS Here are some easy ways to manage files or apps taking up space on your Mac: 1.In Finder,Select a category from the left pane,Then select the app or file you want to delete。 2.Right-click the file or app,Select "Move to Trash",to delete the file or application。 A smart way to better manage storage on your Mac is to use iCloud、Dropbox、Cloud storage options like Google Drive and OneDrive。Apple's iCloud integrated into your Apple ID,It's a very simple way to use it,and will be automatically added to your Mac’s storage options。 CloudMounter is the easiest way to manage all cloud storage containers、best approach。It is located in the menu bar for easy access,and show all cloud storage options in Finder。It helps Mac treat cloud storage as local disk,This makes accessing and managing files very simple。The most important thing is,CloudMounter uses 256-bit encryption,So your documents are always safe。 iStat Menus is an easy-to-use application,The application is also located in the menu bar,and provide a graphical overview of real-time usage of CPU and GPU、Network connections and memory usage。You don't have to click and navigate Apple's layered menus,Just click on the iStat menu to get the same information in a better interface。 The best (and certainly the most powerful) option for managing Mac memory is CleanMyMacX。Like iStat Menus,It has a drop down window in the menu bar,Show details such as CPU or memory usage,And which apps might be sending your Mac into overload?。The application scans your system and identifies unused files、Random system junk、Email attachment,and manage your trash。It can scan for malware,Check for privacy leaks,Optimize your system for fast performance,and perform routine maintenance。 Keep your Mac in tip-top shape Checking and managing storage on your Mac is easy。Although it’s easy to view your Mac’s storage space without a separate app,But there are good reasons to have features for managing your Mac's memory that Apple itself couldn't choose。 Applications often embed files and folders in your Mac's memory,When you delete an app from the Apple menu,These files and folders don't always disappear。Many applications have nasty files,These files persist long after the app is deleted。same,Moving an app to the Trash doesn't actually delete it,This requires some powerful uninstall software to help。
Typora is a simple、Efficient and very elegant Markdown editor,It provides a new Markdown writing experience where what you see is what you get。Typora combines source code editing and effect preview into one,Instantly generate preview effects when entering Markdown code。Typora is one of the most popular Markdown editors on the Internet.。 one、Main Features What you see is what you get:Typora uses a unique What You See Is What You Get (WYSIWYG) model,Allows users to view the rendering effect of Markdown code in real time,No need to enter text and then go to preview mode,Improved writing efficiency。 Simple interface:Typora’s user interface is very simple,No redundant menus and toolbars,Leave only a sidebar and an editing area,Allow users to focus more on writing。 Markdown syntax support:Typora supports most Markdown syntax,include links、picture、sheet、code block、dividing line、emphasize、Paragraph etc.,Meet various writing needs of users。 Custom theme:Users can choose different fonts according to their preferences、background color、line spacing、Title etc.,to create your own exclusive editing style。 Cross-platform compatible:Typora is not only available on the Mac platform,Also supports Windows and Linux。Documents can be seamlessly switched between different platforms,and keep the same format。 two、Interface and functions Editing area and sidebar:Typora's main interface consists of the editing area and sidebar。The editing area is on the left,Is an area where users can enter Markdown code,It is also the display area for WYSIWYG mode.。The sidebar is on the right,is a hidden panel,Users can open or hide the sidebar toggle button by clicking on it。in sidebar,Users can access Typora’s settings、theme、Print、File browser、outline、Directory and other functions。 Text editing mode:Typora has two different text editing modes: WYSIWYG and source code.。Users can switch between these two modes by clicking the "Code" button in the upper right corner of the window or using the shortcut key "cmd+/"。 Shortcut key operation:Typora provides a large number of shortcut keys to improve users' writing efficiency。For example,"cmd+b" can make the selected text bold,"cmd+i" can italicize the selected text,"cmd+k" can add links, etc.。 Automatic save and restore:Typora has the feature to automatically save documents,Documents can be automatically saved to the local hard drive as the user enters text。If the user accidentally closes Typora or the computer suddenly loses power,Typora can automatically restore the document last edited by the user。 three、Advanced features Live preview:Typora supports real-time preview of Markdown text,Allows users to simultaneously edit and view the rendering of a document。so,when user writes,can instantly see how their text will look on screen,and can be adjusted at any time。 full screen mode:Typora offers a "full screen" mode,The editor and preview area can be displayed full screen,Eliminate other distracting elements,Allow users to focus more on writing。 Outline view:Typora’s outline view feature can add hierarchical structure to documents,So that users can better organize and manage documents。in outline view,Users can see the document's title and sections,and easily navigate between chapters。 File export:Typora supports exporting Markdown documents to PDF、HTML、DOCX、ODT and other file formats,Enables users to seamlessly switch and edit between different document types。
Bob is a free and open source Mac translation software,Provide word translation、Screenshot translation and manual input translation function。It supports Youdao translation、Baidu Translate and Google Translate three translation engines,Very convenient to use。 before first use,Users need to obtain accessibility permissions and screen recording permissions。 Main functions: •Word translation: After selecting the text, press the shortcut key (default ⌥ + D) can be translated。 •Screenshot translation: Press the shortcut key (default ⌥ + S),Intercept the area that needs to be translated to translate it。 •Enter translation: Press the shortcut key (default ⌥ + A),Enter text and press Enter to translate。 Translation engine comparison: •Baidu Translate and Google Translate can recognize sentences in camel case,如 “WhatAreYouDoing”。 •OCR interface used for screenshot translation: Use Youdao's OCR interface for image recognition,Then call the Google Translate interface to translate。 •Domestic Google Translate: Can be used directly,No need for scientific Internet access。 Bob is a feature-rich and easy-to-use translation tool for Mac,Suitable for users who need fast and accurate translation。
Many users who are new to macOS may find that their operating habits are different from those they used to do with Windows.。Understand and become proficient in using the following commonly used macOS keyboard shortcuts,Can help you improve work efficiency: cut、Copy and paste •Command-X:Cut selected items and copy to clipboard。 •Command-C:Copy selected items to clipboard。 •Command-V:Paste the contents of the clipboard into the current document or application。 •Command-Z:Undo the previous command,Can be redone using Shift-Command-Z。 •Command-A:Select all。 •Command-F:Find an item in a document or open a Find window。 Window Management •Command-M:Minimize the frontmost window to the Dock。 •Command-W:Close the frontmost window。 •Command-Tab:Switch between open applications。 Screen capture and recording •Shift-Command-5:In macOS Mojave or later,Take a screenshot or record your screen。 •Shift-Command-3:Take a screenshot of the entire screen。 •Shift-Command-4:Take a screenshot of the selected area。 File manipulation and navigation •Command-N:Open a new window or tab。 •Command-Delete:Move selected items to Trash。 •Command-D:Copy selected files or folders。 System Operations •Command-Q:Exit current application。 •Option-Command-Esc:Force quit current application。 •Control-Command-Q:Lock screen now。 View and adjust •Command-Spacebar:Show or hide the focused search bar。 •Command-comma (,):Open the preferences for the front application。 •Command – dispatch center:Show desktop。 Text Editing and Formatting •Command-B:Bold selected text。...
Office includes the new Word、Excel、PowerPoint、Outlook 和 OneNote ,Perfect support for Retina,Support Chinese,Lots of feature updates,Very powerful! # Full-featured and powerful office suite Microsoft Office is a collection of applications,Each application is designed to perform a specific task,And these apps are created to enable you to start working on any type of project,All while knowing you have all the essential tools you need and more。 also,Microsoft Office also makes it possible to share files with your office,Collaboration becomes easy with anyone working on the same presentation or spreadsheet,thus really speeding up work when needed。 # The Office suite of collaboration features and tools, given its large installed base,Millions of users use it every day,You might think of it as a platform,can help you get the job done,It also enables you to stay in touch with colleagues and clients who need it to help you get the job done in a timely manner and as correctly as possible。 Microsoft Office comes with apps to make you more productive,And depending on the version you want to buy (e.g.,Home and Student Edition,Home & Business or Home Premium),It gives you access to Word,PowerPoint,Excel,Utilities like Outlook and other features。SkyDrive storage,Skype minutes and automatic version upgrades。 # A wide range of templates helps you create high-quality documents in no time Plus,Microsoft Office comes with a built-in template library,Allows you to create professional-looking documents and spreadsheets in no time。Another great feature that can greatly improve your work efficiency is,It also works in full screen mode,thus eliminating all possible interference,Focus on the task at hand。 taking all issues into account,If you think the open source Office suite isn't enough for your needs,and you want a professional-grade solution to help you get the most out of your time and money,Then Microsoft Office is what you need。 The latest package contains Microsoft Word Microsoft...
on Apple computer,You can easily take screenshots with shortcut keys such as Shift+Command+3 or Shift+Command+4,But by default the screenshot will be saved on the desktop。If you wish to save the screenshot to another location,You can follow these steps: Graphical tutorial on setting the screenshot save location and creating a new screenshot folder: Create a new folder within the user's "Pictures" folder,For example, name it "Screenshot"。You can use Finder in "Users" > Create this folder in "Pictures"。 Open terminal: Search for and open the Terminal application in Launchpad。 Enter command: Enter the following command in the terminal,and press Enter to confirm: defaults write com.apple.screencapture location ~/Pictures/Screenshot/ This command tells the system to save the screenshot to the specified folder (here is the "Screenshot" folder you created)。If you wish to save the screenshot to another location,Just change the path to your desired folder path。 Restart system services: Enter the following command to restart system services,Make changes effective: killall SystemUIServer This will reload the user interface service,Make sure the new screenshot save location setting takes effect。 Now,Your Mac will save all screenshots to the folder you specify (e.g. "Users/Pictures/Screenshots")。Doing this will help you keep your desktop tidy,Allows you to manage and find screenshot files more conveniently
4K Video Downloader is “a video download tool,so simple,It’s what a video download tool should be like.”。Copy the YouTube video link and click "Paste URL" in the upper left corner of the interface,It can automatically identify 4K or even original resolution video sources.。Next,Select resolution、After formatting, downloading will begin.。 4K video downloader allows high quality from YouTube,and download the videos as quickly as your computer and connection will allow,Audio and subtitles。Just copy the video link from your browser,Then click "Paste URL Special"。Done! Friends who want to save trouble,You can also turn on [Smart Mode],Check the default video download configuration。Just copy and paste the YouTube link later,4K Video Downloader will automatically download according to the configuration,It’s a plus for the software.。 otherinstallation Move 4K Video Downloader.app to “app” folder。 Open 4K Video Downloader 3.x in DMG [SP].app
What to do if PS freezes? Solve the problem easily in a few steps Photoshop (PS) is a powerful image processing software,However, sometimes lag may occur during use.,Even if your computer configuration is not low。generally,This situation is related to the settings of PS。Here are some effective solutions,Help you improve the running speed of PS: 1. Disable the Home screen •Actions:Open PS,Go to Preferences > "conventional",Check "Use the old 'New Document' interface"。 •reason:The home screen of the new version of PS will take up additional resources,Turning it off can lighten the load。 2. Disable less commonly used functions •Operations:Disable less commonly used features under the Tools tab。 •reason:Reducing infrequently used functions can improve the overall running speed of PS。 3. Turn off "Backend Storage" •Operation:Go to Preferences > "File processing",Turn off the "Auto-save recovery information" option。 •reason:Background storage may cause PS to freeze,Especially when working with complex files,Turning it off reduces the burden。 4. Properly set up the scratch disk •Operation:Go to Preferences > "scratch disk",Select SSD as scratch disk,Set up multiple scratch disks (if possible)。 •reason:SSD is faster,Can significantly improve the performance of PS。 5. Adjust graphics processor settings •Action:Go to Preferences > "performance",Choose "Advanced" or "Basic" based on graphics card performance。 •hint:Try turning off the "Use graphics processor" option,See if there is any improvement。 6. Optimize history and cache •Operations:Go to Preferences > "performance",Adjust History and Cache settings。Adjust the cache level (such as 1 or 2) based on the type of image being processed。 •hint:Choose the default settings that suit your type of work (WEB/UI design、Default/Photo、Extra large pixel size)。 7. Optimize layer structure •Operation:Use adjustment layers instead of duplicating layers,Rasterize the smart object after processing is complete。 •reason:Reduce the number of layers and image size,Reduce the operating burden of PS。 8. Adjust text preview settings •Action:Click on the "Text" menu > "Font preview size" > "Small",and in "Preferences" >...
Comments (0)