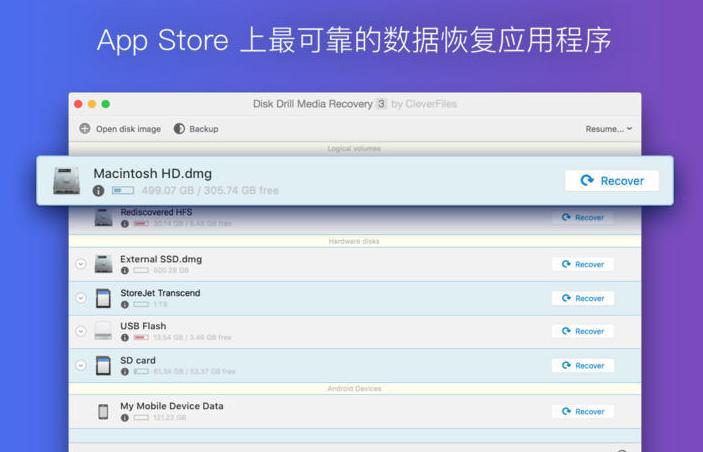
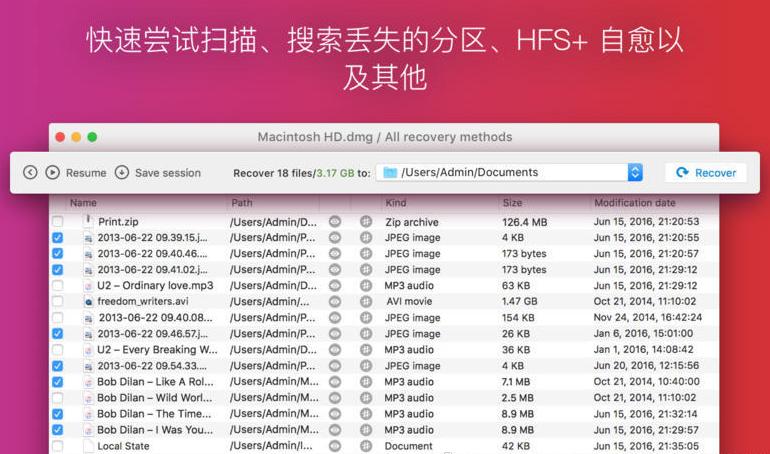
Disk Drill is one of the few data recovery software available on Mac OS X,Support NTFS, HFS+, FAT32 and other modes,Supports hard drives and USB disks,Provides deep scan and quick scan capabilities。
Disk Drill is one of the few data recovery software available on Mac OS X,Specially designed to rescue files accidentally deleted by hand。
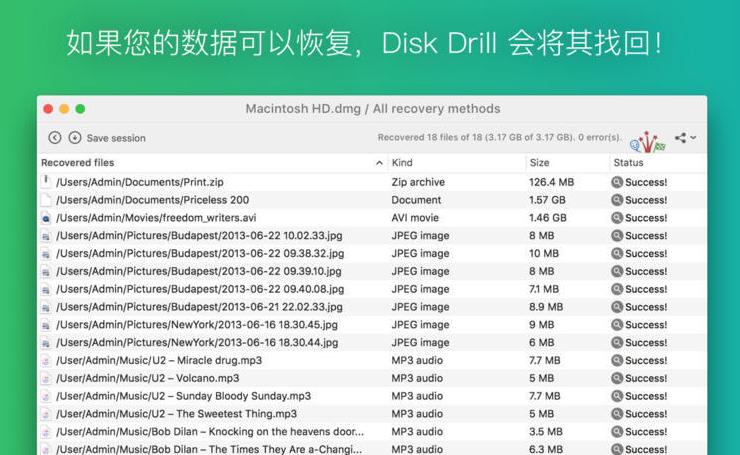
DiskDrill is quite powerful:Support NTFS, HFS+, FAT32 and other modes,Supports hard drives and USB disks,Provides deep scan and quick scan capabilities。A simple boot tutorial is provided when the software is started for the first time.。
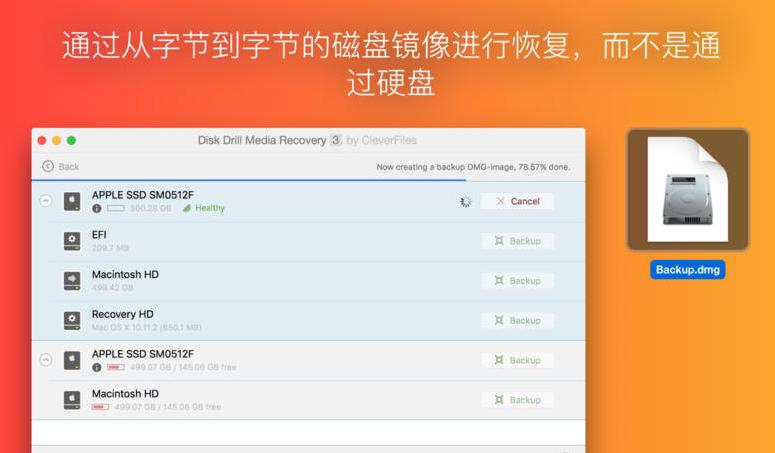
A killer feature is,DiskDrill provides Recovery Vault function,Improved data protection features for HFS/HFS+ and FAT32,Improve chances of recovering files
statement:All articles on this site,If there is no special instructions or markings,All are originally published by this site。any person or organization,Without the consent of this website,Reproduction prohibited、Misappropriate、collection、Publish content from this site to any website、Books and other media platforms。If the content on this site infringes upon the legitimate rights and interests of the original author,You can contact us for processing。
Can free downloads or VIP membership resources be used directly for commercial use?
The copyright of all resources on this site belongs to the original author,The resources provided here are for reference and study purposes only.,Please do not use it directly for commercial use。If copyright disputes arise due to commercial use,All responsibility lies with the user。For more instructions, please refer to VIP introduction。
It prompts that the download is complete but cannot be decompressed or opened?
The most common situation is an incomplete download: You can compare the capacity of the downloaded compressed package with the capacity on the network disk,If it is less than the capacity prompted by the network disk, this is the reason。This is a browser download bug,It is recommended to download using Baidu Netdisk software or Thunder。 If this situation is excluded,You can leave a message at the bottom of the corresponding resource,or contact us。
Can't find the sample image in the material resource introduction article?
For members only、Whole site source code、Program plug-in、website template、Web page templates and other types of materials,The pictures used for introduction in the article are usually not included in the corresponding downloadable material package.。These related commercial images need to be purchased separately,And this site is not responsible for(There is no way)find source。 The same is true for some font files,However, some materials will have a list of font download links in the material package.。
The download address cannot be displayed or the content cannot be viewed after payment?
If you have successfully paid but the website does not pop up a success prompt,Please contact the webmaster to provide payment information for you to process
After purchasing this resource,Can I get a refund?
Source code materials are virtual goods,replicable,Transmissibility,once granted,No refunds of any kind will be accepted、Exchange request。Please confirm before purchasing to obtain the resources you need.
Comments (0)
Note: Please be respectful and civil in your comments Cancel reply
Many friends who often use PS know that,PS brushes can be added by yourself。After you download some beautiful brush materials from the Internet,,How to import them into PS? The following is a detailed introduction to several methods of importing and installing PS brushes.。 Method one:Double-click to install Double-click to install: Download and save the brush file in “.abr” format。Then,Double-click the downloaded .abr brush file,can be automatically imported into Photoshop。 Method two:Drag and drop installation Drag and drop installation: Drag the downloaded ".abr" brush file directly into the open Photoshop window,Quickly install and import。 Method three:Import into the brush and open the brush panel: in Photoshop,Click "Window" on the top menu bar,Then select Brushes to open the Brushes panel。 Import brushes: Click the "≡" icon in the upper right corner of the brush panel,Select Import Brushes。 Select brush file: In the pop-up dialog box,Find and select the ".abr" brush file you downloaded earlier,Then click Open,can be successfully imported into Photoshop。 Through the above simple methods,You can easily import the downloaded brush materials into Photoshop for Mac,Have fun creating!
MacCleaner Pro is a professional Mac cleaning tool suite software,Keep your Mac fast、clean and orderly,Helps you see what's taking up the most space on your Mac,Unnecessary files found,and reclaim hard drive space。It can clean junk files in one click、Optimize RAM、Manage extensions and fix issues,Make your Mac run faster。MacCleaner Pro is packed with features,For example cleaning invalid RAM memory、Disable startup programs、Reindex Spotlight and Mail、Remove unnecessary plugins and extensions、Close memory-intensive apps、clear cache、Delete installation files and unnecessary localization files, etc.。also,MacCleaner Pro also offers several additional tools,Such as App Cleaner & Uninstaller、Duplicate File Finder和Disk Space Analyzer,Help you perform deep cleaning。MacCleaner Pro user feedback is positive,Recommended by many users。
Typora is a simple、Efficient and very elegant Markdown editor,It provides a new Markdown writing experience where what you see is what you get。Typora combines source code editing and effect preview into one,Instantly generate preview effects when entering Markdown code。Typora is one of the most popular Markdown editors on the Internet.。 one、Main Features What you see is what you get:Typora uses a unique What You See Is What You Get (WYSIWYG) model,Allows users to view the rendering effect of Markdown code in real time,No need to enter text and then go to preview mode,Improved writing efficiency。 Simple interface:Typora’s user interface is very simple,No redundant menus and toolbars,Leave only a sidebar and an editing area,Allow users to focus more on writing。 Markdown syntax support:Typora supports most Markdown syntax,include links、picture、sheet、code block、dividing line、emphasize、Paragraph etc.,Meet various writing needs of users。 Custom theme:Users can choose different fonts according to their preferences、background color、line spacing、Title etc.,to create your own exclusive editing style。 Cross-platform compatible:Typora is not only available on the Mac platform,Also supports Windows and Linux。Documents can be seamlessly switched between different platforms,and keep the same format。 two、Interface and functions Editing area and sidebar:Typora's main interface consists of the editing area and sidebar。The editing area is on the left,Is an area where users can enter Markdown code,It is also the display area for WYSIWYG mode.。The sidebar is on the right,is a hidden panel,Users can open or hide the sidebar toggle button by clicking on it。in sidebar,Users can access Typora’s settings、theme、Print、File browser、outline、Directory and other functions。 Text editing mode:Typora has two different text editing modes: WYSIWYG and source code.。Users can switch between these two modes by clicking the "Code" button in the upper right corner of the window or using the shortcut key "cmd+/"。 Shortcut key operation:Typora provides a large number of shortcut keys to improve users' writing efficiency。For example,"cmd+b" can make the selected text bold,"cmd+i" can italicize the selected text,"cmd+k" can add links, etc.。 Automatic save and restore:Typora has the feature to automatically save documents,Documents can be automatically saved to the local hard drive as the user enters text。If the user accidentally closes Typora or the computer suddenly loses power,Typora can automatically restore the document last edited by the user。 three、Advanced features Live preview:Typora supports real-time preview of Markdown text,Allows users to simultaneously edit and view the rendering of a document。so,when user writes,can instantly see how their text will look on screen,and can be adjusted at any time。 full screen mode:Typora offers a "full screen" mode,The editor and preview area can be displayed full screen,Eliminate other distracting elements,Allow users to focus more on writing。 Outline view:Typora’s outline view feature can add hierarchical structure to documents,So that users can better organize and manage documents。in outline view,Users can see the document's title and sections,and easily navigate between chapters。 File export:Typora supports exporting Markdown documents to PDF、HTML、DOCX、ODT and other file formats,Enables users to seamlessly switch and edit between different document types。
Termius usage tutorial:How to connect to the server through SSH [XShell alternative artifact] Termius is a very easy-to-use and beautiful SSH client,Ability to quickly remotely control servers,You can also customize your favorite themes。It not only supports Windows、Linux、macOS,Also supports Android and iOS,Allow programmers to troubleshoot online problems anytime and anywhere,Greatly facilitates work。 Software features •Free •Supports username, password and key mode •Common script snippets (can be sent to multiple hosts at the same time) •Full platform support •Cloud synchronization (just register an account) •Split-screen mode (no setting method has been found yet) Software environment •One Mac •Termius client •One remote server Software configuration •Terminal (theme)、color matching、Fonts, etc.) •Shortcuts (shortcut keys) •Known Hosts (host address management) •Keychain (login information management) •Profile (account information) Configuring keys Today we mainly learn how to configure login information (key mode)。Follow these steps: 1.Click the downward arrow in the upper right corner,Select Keychain。 2. Click ADD KEY (ADD IDENTITY...
in macOS,Although there is no address bar like Windows to directly copy the file path,But there are several ways to quickly get the file or folder path: Quick copy path method: 1. Use the shortcut Command + Option + C Select the file or folder in Finder,Then press the shortcut key Command + Option + C,to copy the full path of the file or folder。 2. Use right-click menu: Select a file or folder in Finder,Right click。Hold down the Option key,You will see "Copy *** as path name",Select this option to copy the path to a file or folder to the clipboard。 3. Drag file into text editor: Drag files or folders directly into a text editor (such as TextEdit),The text editor will automatically display the full path to the file,You can then copy the path directly。 These methods can quickly and easily obtain the path information of any file or folder in macOS。
QuickTime Player is a pre-installed application on Mac systems,The main function is to play videos,But it can also be used to edit audio。So how to use QuickTime Player to cut and edit audio? This article will introduce the use of Mac’s built-in audio editing software。 1.Open QuickTime Player and click on the launch pad at the bottom of the screen,Select the system's built-in playback software QuickTime Player and open it。 2.Import audio files Drag the audio files to be edited into QuickTime Player,Let go and move on to the next step。 3.Start editing After the audio file is opened,Find the "Edit" column in the menu bar at the top of the MacBook interface,and find "Trim..." from the drop-down menu。 4.Select the clip part and a golden edit box will appear in the QuickTime Player playback window.。Move the selector forward or backward,Move the left and right sides to the part that needs to be cropped。 5.Complete trimming After selecting the clipping part,Click the "Trim" button in the upper right corner of the page。 6.Save the edited audio After editing is complete,Click "File" on the top menu bar of your MacBook,Select "Storage" from the drop-down menu。In the pop-up information filling interface,After entering the relevant content, click the "Save" button in the lower right corner of the page.。 Go through the above steps,You can use QuickTime Player to easily complete audio editing operations。
Combo Cleaner is a system cleaning and anti-virus software on the Mac platform,Can be used to help your Mac clean up junk files on the disk、Malware and virus detection,It is a very simple and easy-to-use disk cleaning tool。 Combo Cleaner Premium is an easy-to-use antivirus and malware removal tool。Our anti-malware engine is certified by OPSWAT Labs。Includes adware and potentially unwanted applications,Thus leading to unwanted advertisements while browsing the Internet。 Features of Combo Cleaner: Equipped with award-winning viruses certified by OPSWAT,Malware and adware scanning engine。Hourly malware definition updates,Your Mac will be protected from the latest security threats。 Duplicate files are identical copies stored in various locations on your hard drive。Combo Cleaner will find and delete these files that waste valuable disk space。 disk cleaner,Your Mac is free of junk and outdated files,May accumulate megabytes of wasted disk space。 Large file searcher checks your local and external disks,Instantly list all files and folders larger than 100 megabytes (or any other user-defined size)。 When you delete an app from your Mac,Many useless and redundant files are often retained in the system。 Combo Cleaner will find these files and delete them。 Scan installed browsers,And allows you to easily delete browsing history BitMedic AntiVirus Security,Cookies etc.。Take privacy into your own hands。
How to completely uninstall AutoCAD 2019:Tutorial for uninstalling CAD on Mac. Many Mac users find that after installing AutoCAD,Found that all files cannot be completely cleared during uninstallation,Especially if you want to update to a new version of AutoCAD。This tutorial details how to completely uninstall AutoCAD 2019。 1. Use the software’s built-in uninstaller •Click Launchpad to enter the software menu,Find and click "Remove AutoCAD 2019"。 2. Continue the uninstall process •Click “Continue” to continue uninstalling AutoCAD 2019 Cracked version。 3. Enter your administrator password •After entering your Mac password,Click "OK" to agree to uninstall AutoCAD 2019。 4. Complete the initial uninstall •After canceling the "OK" option,Click "Close"。 5. Check for residual files •Open Launchpad to check if there are still any residual files。 6. Manually delete residual files •Go to the Applications folder,turn up...
XMind is a powerful mind mapping software,But sometimes the file may be damaged and cannot be opened.。Here are the steps to resolve this issue: Open the XMind app: Start XMind software。 Enter file cache: Select "File" in the menu bar。 Click on the File Cache option。 Select the files that need to be recovered: in file cache,Find and select the files that need to be recovered。 Recover files: Click the "Retrieve" button,to recover selected files。 Reopen file: After recovery is complete,Try reopening the XMind file,Check whether you can access and edit normally。 These steps can often help you recover XMind files that cannot be opened due to file corruption。Make sure to back up important files before proceeding,To prevent unexpected situations from happening。 If the above methods cannot solve the problem,You may want to consider using XMind's backup files or contact XMind's support team for further assistance and support。 through these methods,You can effectively deal with XMind file corruption issues,Make sure you continue to use this great mind mapping software effectively。
What to do if PS freezes? Solve the problem easily in a few steps Photoshop (PS) is a powerful image processing software,However, sometimes lag may occur during use.,Even if your computer configuration is not low。generally,This situation is related to the settings of PS。Here are some effective solutions,Help you improve the running speed of PS: 1. Disable the Home screen •Actions:Open PS,Go to Preferences > "conventional",Check "Use the old 'New Document' interface"。 •reason:The home screen of the new version of PS will take up additional resources,Turning it off can lighten the load。 2. Disable less commonly used functions •Operations:Disable less commonly used features under the Tools tab。 •reason:Reducing infrequently used functions can improve the overall running speed of PS。 3. Turn off "Backend Storage" •Operation:Go to Preferences > "File processing",Turn off the "Auto-save recovery information" option。 •reason:Background storage may cause PS to freeze,Especially when working with complex files,Turning it off reduces the burden。 4. Properly set up the scratch disk •Operation:Go to Preferences > "scratch disk",Select SSD as scratch disk,Set up multiple scratch disks (if possible)。 •reason:SSD is faster,Can significantly improve the performance of PS。 5. Adjust graphics processor settings •Action:Go to Preferences > "performance",Choose "Advanced" or "Basic" based on graphics card performance。 •hint:Try turning off the "Use graphics processor" option,See if there is any improvement。 6. Optimize history and cache •Operations:Go to Preferences > "performance",Adjust History and Cache settings。Adjust the cache level (such as 1 or 2) based on the type of image being processed。 •hint:Choose the default settings that suit your type of work (WEB/UI design、Default/Photo、Extra large pixel size)。 7. Optimize layer structure •Operation:Use adjustment layers instead of duplicating layers,Rasterize the smart object after processing is complete。 •reason:Reduce the number of layers and image size,Reduce the operating burden of PS。 8. Adjust text preview settings •Action:Click on the "Text" menu > "Font preview size" > "Small",and in "Preferences" >...
Apple's new MacBook series notebooks are equipped with keyboard backlights,Can provide lighting when light is low。However,Sometimes you may encounter a situation where the Mac keyboard light cannot be adjusted。Here are the steps on how to adjust MacBook keyboard backlight brightness: 1. Open System Preferences and click the Apple icon in the upper left corner of the screen,Select "System Preferences"。 2. Enter the keyboard settings in the pop-up interface,Click "Keyboard"。 3. Adjust keyboard backlight settings under the "Keyboard" tab,Uncheck the "Automatically adjust keyboard brightness in low light" option。so,You can manually adjust the brightness of the keyboard light。 Go through the above steps,You can freely adjust the brightness of MacBook keyboard backlight。
Little Snitch is an old and excellent application firewall software on the Mac platform.,Little Snitch cracked version can control network connection access permissions of all applications/single applications on macOS,Alert you in real time about outbound network connections。 App Introduction Little Snitch allows you to intercept these unwanted connection attempts,and let you decide how to proceed。it can notify you,When a program attempts to establish an outgoing Internet connection。Then,You can choose to allow or deny this,Or define a rule how to handle something like,Future connection attempts。This reliably prevents private data from being sent to you without your knowledge。The inconspicuous Little Snitch runs in the background,It can also detect network viruses,Trojan and other malware-related activity。 Alert mode whenever an application attempts to connect to a server on the network,Little Snitch will display a connection alert,Allows you to decide whether to allow or deny the connection。 No data is transferred without your consent。 Your decision will be remembered and applied automatically in the future。 Silent Mode If you are new to Little Snitch,You may be inundated with notifications from apps that want to connect to the internet。Brand new silent mode built from the ground up,to make handling them a breeze。It lets you silence all notifications for a certain period of time,and make all decisions conveniently at a later time。
Comments (0)