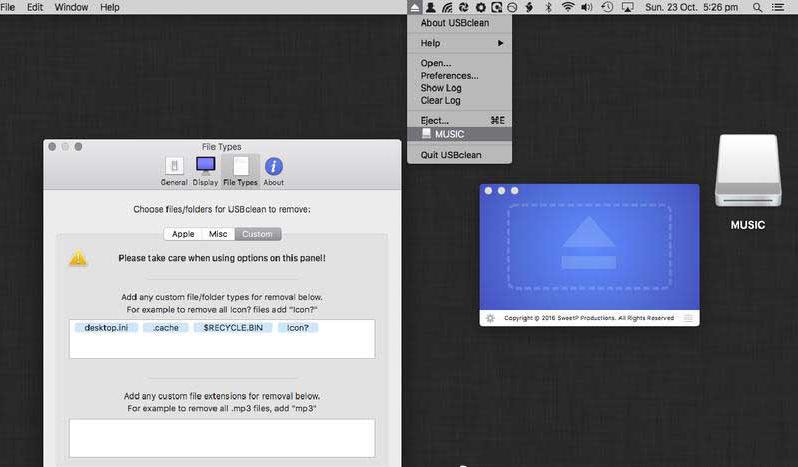
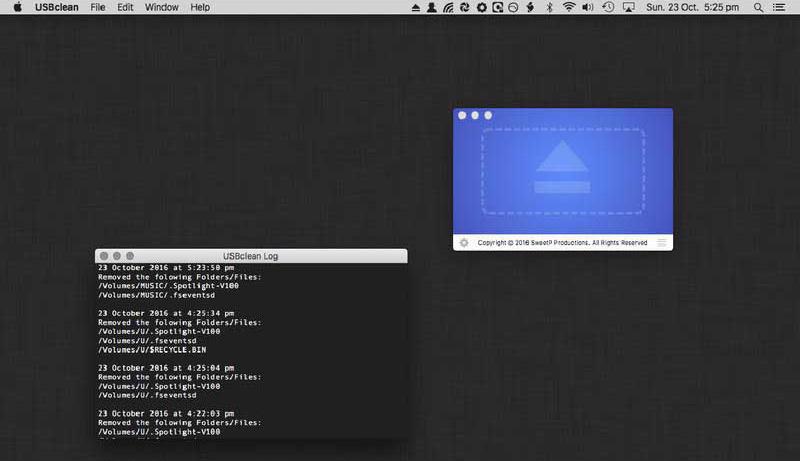
USBclean is a powerful U disk virus scanning tool on the Mac platform,USBclean can help you remove all those nasty junk files quickly and easily and also format your USB drive.,You can easily launch USBclean from the system menu bar and run it directly。
独有的分类查杀引擎具有检测查杀470余种U盘病毒
U盘病毒广谱扫描,U disk virus immunity,Fix display of hidden files and system files,Safely uninstall mobile disk drive letter and other functions,Comprehensive integrated repair and removal of U disk viruses。
At the same time, USBCleaner can quickly handle new U disk viruses.。
statement:All articles on this site,If there is no special instructions or markings,All are originally published by this site。any person or organization,Without the consent of this website,Reproduction prohibited、Misappropriate、collection、Publish content from this site to any website、Books and other media platforms。If the content on this site infringes upon the legitimate rights and interests of the original author,You can contact us for processing。
Can free downloads or VIP membership resources be used directly for commercial use?
The copyright of all resources on this site belongs to the original author,The resources provided here are for reference and study purposes only.,Please do not use it directly for commercial use。If copyright disputes arise due to commercial use,All responsibility lies with the user。For more instructions, please refer to VIP introduction。
It prompts that the download is complete but cannot be decompressed or opened?
The most common situation is an incomplete download: You can compare the capacity of the downloaded compressed package with the capacity on the network disk,If it is less than the capacity prompted by the network disk, this is the reason。This is a browser download bug,It is recommended to download using Baidu Netdisk software or Thunder。 If this situation is excluded,You can leave a message at the bottom of the corresponding resource,or contact us。
Can't find the sample image in the material resource introduction article?
For members only、Whole site source code、Program plug-in、website template、Web page templates and other types of materials,The pictures used for introduction in the article are usually not included in the corresponding downloadable material package.。These related commercial images need to be purchased separately,And this site is not responsible for(There is no way)find source。 The same is true for some font files,However, some materials will have a list of font download links in the material package.。
The download address cannot be displayed or the content cannot be viewed after payment?
If you have successfully paid but the website does not pop up a success prompt,Please contact the webmaster to provide payment information for you to process
After purchasing this resource,Can I get a refund?
Source code materials are virtual goods,replicable,Transmissibility,once granted,No refunds of any kind will be accepted、Exchange request。Please confirm before purchasing to obtain the resources you need.
Comments (0)
Note: Please be respectful and civil in your comments Cancel reply
Many users who are new to using MacOS system,I feel that Mac computers have no obvious advantages over Windows computers.,I don’t understand why everyone praises Mac so much。Actually the problem is not that Mac is not easy to use,It’s because novice users won’t be able to use it。 This article introduces 12 essential tips for Mac,I hope that friends who are just starting to use Mac can feel its superiority! 1. screenshot • cmd + shift + 3: Take a screenshot of the entire screen •cmd + shift + 4: Take a screenshot of an area of your choice • cmd + shift + 4 + space (space bar): Take a screenshot of a selected application interface window. You can also use Snip to scroll through the screenshot.,Take a long screenshot of a web page。 2. Automatically hide the Dock if you are a severe computer mysophobia patient,I think the Dock is unsightly,Or you want to hide the dock to save space?,You can follow these steps: •Open System Preferences •Select the Dock •Click "Automatically show and hide the Dock" after setting,The Dock will only be brought up when the mouse touches the bottom,If you are not used to it,You can return to the original path to cancel the settings.。 3. Split-screen function The split-screen function allows us to arrange the application windows more reasonably and effectively.,Improve work efficiency。 • Press and hold the green full-screen button in the upper left corner of any open window • The window will shrink while you hold the button,You can drag it to the left or right side of the screen • Release the button,Then click on another window,You can use the two windows side by side,You can also adjust the proportion of the two pages if you have an idle iPad,You can use Duet...
Desktop Mac or MacBook won't turn on,Or maybe it can't be launched via the Apple icon? Don't worry,Although it makes people irritated,But it's usually fixable。 Here are all the steps you need to take to restart your Mac。Follow the steps in order,until the problem is solved,Or jump to the applicable step。 1. Check the power connection • Make sure your Mac is plugged into the power adapter,and the adapter is connected well。For desktop Mac,Make sure the power cord is also connected to the electrical outlet。 2. Power cycle •For the latest MacBooks,Disconnect the power cord,Then press and hold the power button for 10 seconds。 •For older MacBooks,Disconnect the power cord and remove the battery for at least 10 seconds。 •For desktop Mac,Disconnect the power cord for at least 10 seconds。 3. Boot in safe mode •Press the power button,Then immediately hold down the Shift key until you see the login screen。 4. Reset the System Management Controller (SMC) Desktop Mac: Unplug the power cord,wait 15 seconds,then reinsert,Wait another five seconds before restarting。 •2018 MacBook Pro and MacBook with T2 chip: Hold down the right Shift key、Left Option key and left control key for seven seconds,Then press and hold the power button for seven seconds。 • MacBook without removable battery: Hold left Shift、Option、Control and power (or Touch ID) buttons,Lasts 10 seconds。 5. Reset NVRAM or PRAM • Hold Option while booting、Command、P and R keys,Don't let go until you hear the startup sound。 6. Run Apple Diagnostics • Press the power button,Then hold down the D key until you see the language selection screen。After selecting language,Start running tests。 7. Using Recovery Mode Tools • Hold the Command and R keys to boot into Recovery Mode。Repair your hard drive or SSD using Disk Utility。 8. Reinstall macOS in recovery mode • If none of the above fixes the issue,Choose to reinstall macOS。Select Reinstall macOS from the menu,and follow the on-screen instructions。 Go through the above steps,You should be able to fix most Mac won’t turn on issues。If the problem is still not resolved,May require further hardware checks or professional support。
Master these Word skills,Easily double your work efficiency! Word as an essential office skill,Widely used in the workplace,But most people are limited to basic word processing。today,We share three very practical Word tips,Make your work more efficient! Remove spaces with one click when processing copied documents,Removing spaces is a common requirement。Do not delete one by one,Instead use the shortcut: Press Ctrl + H Open the Find and Replace window。 Enter ^w in the "Find what" box,Then click "Replace All"。 Delete empty lines with one click except spaces,Blank lines are also a common problem。Here’s a quick fix: Press Ctrl again + H Open the Find and Replace window。 Enter ^p^p in the "Find what" box,Enter ^p in the "Replace with" box,Then click "Replace All"。 Separate text with one click Keeping text formatted neatly is a common need: Select the text to be divided into columns。 Go to the "Layout" tab,Select "Column",Then select the desired number of columns。 master these techniques,allows you to write a paper、manual、Get your work done faster and more efficiently in flowchart and table creation!
Wondershare Recoverit is a very reliable data recovery tool,It can recover data from any storage media。No matter where your data is lost from,Where can it help you find it?,Include deleted files,recycle bin,Format disk,Partition lost,external device,Virus attack data, etc.。 WonderShare Recoverit is a comprehensive data recovery suite,Used to recover due to accidental deletion、format、viral infection、Improper operation、Mac data lost due to unexpected power outage and other reasons。it can be lost from、delete、Logically corrupted and formatted Mac hard drive、iPod、USB drive、SD card、digital camera、mobile phone、Recover Mac data from MP3 and MP4 players。Compatible with HFS,FAT 16/32 and NTFS file system volumes,This lossless Mac file recovery software ensures safe recovery of Mac files,Without modifying the original data saved on your Mac machine or any other storage media。Versatile preview allows you to enjoy Mac data recovery in advance。 Function safety first: Read-only and risk-free MAC data recovery program。 No writing operations to the original data。 Multifunctional preview function: for images,Displays real-time and direct scan results during the scan process,to make the user stop scanning after finding the target image。 For other Mac files such as videos、audio file、Archives and documentation),They are displayed as text in hex mode for preview,So that users can enjoy file recovery on Mac in advance。 Accurate file recovery for Mac: Before doing data recovery on Mac,You can select the target file types to scan,This will save you a lot of time,Especially when you have a lot of files on your Mac computer。 Use original file name、Recover deleted files from Mac with shooting date and storage path。 Support file name search scan results,Provides you with precise MAC file recovery。 Easy to use and clean interface: Complete wizard and easy-to-use interface let you perform MAC data recovery in a breeze。
iNet Network Scanner is a network device monitor on Mac,Ability to automatically scan and discover devices on the network,Shows the device’s IP address、Manufacturer、MAC address, etc.,Support network equipment、BonjourService、Airport etc. iNet Network Scanner gives you all the information about your Mac network and the devices your Mac is connected to,Ease of use and perfectly thoughtful design allow even inexperienced users to gain a deep understanding and overview of the network,Report on running services and quality of wireless network connections。 Function introduction Network scanner Bonjour browser WiFi wireless monitor Wake on LAN We did our best to develop a solution,Make network observation as simple as possible。Whether you are a networking expert or a casual user – iNet Network Scanner provides all the network information you need to know。 network scanner: View all devices that are online and connected to the network,together with suppliers, IP and MAC addresses Assign your own name and icon,or from the provided icon,To facilitate identification of device selections in the scan list。Most Mac devices display with the original icon。 Set up scan ranges and interface scans Export scan results in CSV format Connect to devices via different protocols Bonjour monitors: Detect all running Bonjour services,Real-time detection of services running on discrete devices Detailed information about services Select active Bonjour domains for observation WiFi network monitoring: Pay attention to providing users with the latest 2013 version of the network and 802.11ac:Because SNMP support has been disabled,iNet cannot retrieve usage statistics and wifi strength anymore with these models。 All other features of iNet work fine。The following airport surveillance features can only be used with pre-802.11ac models: See the Current Status of Apple AirPort Base Stations Like Wireless Express or Time Capsule Monitor Network Traffic for Wireless Devices Find the MAC Address of Your AirPort Base Station,IP,For details such as channels used, see Connection quality for wireless clients on live connections Wake on LAN:...
Many Mac users may encounter this problem:How to prevent others from viewing files or photos on your Mac? Mac is not like PC where you can hide folders directly,So how does macOS encrypt files? Today I will bring you a tutorial on encrypting files on Mac。 step one:Open Disk Utility 1. Method one:Via the magnifying glass button • Click the magnifying glass button in the upper right corner of the screen。 •Enter “Disk Utility” in the pop-up dialog box,Then press Enter。 2. Method two:Via Launchpad •Click the Launchpad icon at the bottom of the screen。 •Find the "Other" folder in Launchpad and click to open。 •Select "Disk Utility" in the "Other" folder and click Open。 Step 2:Create an encrypted folder 1. Click "File → New Image → Blank Image" in the menu bar in the upper left corner。 2.Enter the folder name in the dialog box,And select the encryption method in the encryption options below。 3.The system will pop up a dialog box,Ask for password and verify。After input is completed,Click the "Choose" button,Then click "Save" at the bottom right of the dialog box。 4.After setting up,Two icons will appear on the desktop。Drag the file that needs to be encrypted to the second icon (the original file will still be in,Finally delete the original file to achieve the encryption effect)。 5.After dragging and dropping files,Right click on the icon,Select "Launch 'Unnamed'"。Finally, click on the encrypted .dmg file and enter the password to view the encrypted file。 Go through the above steps,You can create an encrypted folder on your Mac,Effectively protect your privacy and important files。
Dynamic Wallpaper Engine(Live wallpaper engine)It is a dynamic wallpaper tool carefully built for Mac users.,Let users say goodbye to the single static wallpaper of the past,Experience vibrant live wallpapers。This program provides ready-made video materials for users to choose from,It also supports importing local videos。The most convenient thing is that users can set the selected video as desktop wallpaper,You can also freely set it as a screen saver for your computer,Make your desktop come alive、interesting。 feature: 2000+Exquisite video material,Continuous updates,You don’t have to spend time finding material。 Video material classification:4K ultra clear、cartoon animation、natural humanities、Cute pets、game world、creative video、Pleasant beauty、antique style、Movie stars, etc.,There is always a style that suits you。 Support "keyword search",Search for your favorite live wallpaper。 Support "add playlist",single cycle、List loop、Shuffle mode。 Support scheduled switching,Automatically switch live wallpaper every half hour/hour/daily。 Support dynamic screensaver,Personalized lock screen,Full of style。 Support "break reminder",Custom reminder time,Avoid eye and brain fatigue。 Import local videos with one click,Convenient and fast。 Supports multiple screen aspect ratios and native resolutions,Support fish screen。 Support multiple monitors,Different dynamic wallpapers for different monitors。 Turn on smart control,Automatically pause when using other apps,Work without being disturbed。 Automatically pause when power is not connected,Save power。 Support hiding desktop icons,Immersive experience。 Support "global shortcut keys",Switch wallpapers with one click、Hide desktop icons、display saver。 one time purchase,Valid permanently,There are no charging points in the software。 Zero App learning cost,Simple interaction,Pursue the best experience。 Dynamic Wallpaper is designed to provide a fun experience,while occupying as little system resources as possible。
Termius usage tutorial:How to connect to the server through SSH [XShell alternative artifact] Termius is a very easy-to-use and beautiful SSH client,Ability to quickly remotely control servers,You can also customize your favorite themes。It not only supports Windows、Linux、macOS,Also supports Android and iOS,Allow programmers to troubleshoot online problems anytime and anywhere,Greatly facilitates work。 Software features •Free •Supports username, password and key mode •Common script snippets (can be sent to multiple hosts at the same time) •Full platform support •Cloud synchronization (just register an account) •Split-screen mode (no setting method has been found yet) Software environment •One Mac •Termius client •One remote server Software configuration •Terminal (theme)、color matching、Fonts, etc.) •Shortcuts (shortcut keys) •Known Hosts (host address management) •Keychain (login information management) •Profile (account information) Configuring keys Today we mainly learn how to configure login information (key mode)。Follow these steps: 1.Click the downward arrow in the upper right corner,Select Keychain。 2. Click ADD KEY (ADD IDENTITY...
If you want to test network speed on Mac,To ensure the performance of your network connection or to diagnose network problems,The following methods can be used: Use the built-in Network Utilities 1. Open "Network Utilities" •Click on the Apple icon in the upper left corner of the desktop,Select "System Preferences"。 •In System Preferences,Select "Network"。 •In the Network window,Click the "Advanced" button in the lower left corner,Then select the Network Utilities tab。 2.Test your network speed •In the Network Utilities window,Select the "Information" tab。 •View network connection details,including signal strength、Connection speed etc.。 Use an online internet speed test tool 1. Visit the Internet speed test website •Open Safari or other browsers。 •Visit a popular internet speed test website,For example Speedtest.net or Fast.com。 2.Run the test •Click the "Start Test" or similar button on the website。 •Wait until the test is complete,You will see the download speed of your network、Upload speed and latency (ping) and other information。 Use the terminal command line tool 1. Install speedtest-cli • Open the Terminal application (this can be done by clicking on the magnifying glass icon on the desktop,Type "terminal" and press Enter to find)。 •Install the speedtest-cli tool,Enter the following command and press Enter: brew install speedtest-cli if Homebrew is not installed,You need to install Homebrew first。 2.Run the test •In the terminal,Enter the following command and press Enter: speedtest This will show your network download speed、Upload speed and latency information。 Through the above methods,You can easily test network speed on your Mac system,Ensure network connection stability and performance。
Many new Mac users don’t know how to type command⌘、Special symbols such as option⌥,Most of the online tutorials are out of date or complicated and difficult to understand.。Today I will share with you a simple and easy-to-understand tutorial,Teach you how to type these special symbols on Mac computers。 1. Open System Preferences •Enter System Preferences,Select "Keyboard"。 2. Enable special symbols option • Check the options in the red box (if already checked, no changes are required)。 3. Display emoticons and symbols •Click the input method icon in the status bar,Select "Show emoticons and symbols"。 4. Custom symbol list •In the pop-up interface,Click the settings gear icon in the red box,Then click "Customize List"。 5. Add technical symbols •In the pop-up interface,Check "⌘ Technical Symbol" in the red box。 6. Type special symbols •Now you can see various special symbols,Double-click the symbol to type it out。 7. Quickly call out symbols •Enter symbols quickly and easily,Follow these steps: •Open System Preferences → Keyboard,Select the "Text" column。 •Press the "plus sign" in the image to add a shortcut code。 • For example: •The input code is “command”,The phrase is "⌘" •The input code is "option",The phrase is "⌥"
Passwords saved in Safari can help you log into websites easily,without having to enter your credentials every time。sometimes,You may want to check、Edit or delete Safari saved passwords。Here are the steps on how to view Safari saved passwords on Mac: View Safari saved passwords 1. Open the Safari browser Launch the Safari browser,Then click on the "Safari" menu in the upper left corner of the screen,Select "Preferences"。 2. Access password settings in the pop-up "Preferences" window,Click on the "Password" option。 3. Enter your computer password. You will be asked to enter your Mac’s administrator password.,to verify your identity。After entering the password,Click "OK"。 4. View saved passwords after successful login,You will see a list of saved passwords。Click on any website entry,You can view the corresponding password。 5.Delete Password If you want to delete a saved password,Select this password entry,Then click the "Remove" button in the lower right corner。 6. Add new password To add a new password entry,Click the "Add" button in the lower right corner,Enter relevant information and save。 Go through the above steps,You can easily view、Remove or add Safari saved passwords。
on Apple computer,You can easily take screenshots with shortcut keys such as Shift+Command+3 or Shift+Command+4,But by default the screenshot will be saved on the desktop。If you wish to save the screenshot to another location,You can follow these steps: Graphical tutorial on setting the screenshot save location and creating a new screenshot folder: Create a new folder within the user's "Pictures" folder,For example, name it "Screenshot"。You can use Finder in "Users" > Create this folder in "Pictures"。 Open terminal: Search for and open the Terminal application in Launchpad。 Enter command: Enter the following command in the terminal,and press Enter to confirm: defaults write com.apple.screencapture location ~/Pictures/Screenshot/ This command tells the system to save the screenshot to the specified folder (here is the "Screenshot" folder you created)。If you wish to save the screenshot to another location,Just change the path to your desired folder path。 Restart system services: Enter the following command to restart system services,Make changes effective: killall SystemUIServer This will reload the user interface service,Make sure the new screenshot save location setting takes effect。 Now,Your Mac will save all screenshots to the folder you specify (e.g. "Users/Pictures/Screenshots")。Doing this will help you keep your desktop tidy,Allows you to manage and find screenshot files more conveniently
Comments (0)